In this article I am going to eyplain how to take a screenshot.
How To Do A Screenshot
If you want to know how to screenshot it’s really not so much of a difference whether you want to know how to take a screenshot on a pc or how to screenshot on a mac. I will explain both ways individually and in detail anyways.
How To Take A Screenshot On A Mac
There are several different ways to take screenshot on mac. I will give you an overview over the most useful shortcuts to make a screen capture.
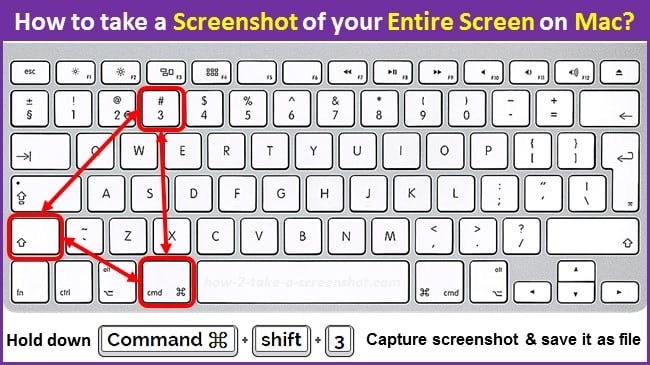
If you just want to take a screenshot of your entire screen and save it as a file to your desktop just hit Command+Shift+3 and you’re done.
To save your screenshot to your clipboard hit Command+Control+Shift-3. Adding “Control” to your keyboard shortcuts always advises your mac to save to the clipboard rather than to your desktop.
If you don’t want to capture your whole screen but rather a section of it hit Command+Shift+4 and then select the area that you want to capture. Your mac will than save this section as a new file on your desktop. If you rather want to save it to your clipboard hit Command+Control+Shift+4
If you don’t want to be bothered selecting an area but rather want a screenshot of a certain window you can hit Command+Shift+4 click space and then select the window you want to capture. The screenshot will again be saved to your desktop.
And if you want to save the screenshot of a window to your clipboard instead of to your desktop start by hitting Command+Control+Shift+4 then click space and select a window.
How To Take A Screenshot On A PC
If you want to take a windows screenshot it’s only a little bit more complicated since windows won’t save your image automatically.
SCREENSHOT WINDOWS XP
Make sure you see on your screen what you want to capture. Be aware if you take screenshots they will always capture your whole screen by default. So make sure everything you don’t want to show is hidden by a window or put away in a folder.
Then look at your keyboard and find the “Prnt” or “Prnt Scr” (Print Screen) key. Usually it is located in the upper right corner of your keyboard. Hit this key. If you rather want to capture a single window select the window and hit Alt+PrntScr.
Now your screenshot is temporarily stored in your clipboard. If you hit the Print-Screen-key again this image will be overwritten and can not be restored hence you need to save it for further use.
Open Microsoft Paint or any painting program you like. Right click on the canvas and select “Paste” from the upcoming menu. You can also directly insert the screenshot into Word or an E-Mail. If you don’t want to use your mouse you can use the keyboard shortcut Ctrl+V to paste your screenshot into any program you like.
SCREENSHOT WINDOWS 7
Of course you can use the same method as for Windows XP. But there is also another tool available in Windows 7. Click “Start” and type “snipping tool” into the search field then click on the search result “snipping tool”.
Click on the arrow right beside “New” and choose the shape you want your screenshot to be. Click on “New” to start the screenshot modus. Select the area of your screen that you want to capture by dragging your mouse.
After the screen capture your image will show up in a new window. Now you can either save or edit it as you please.
Now that you know how to take a screenshot go ahead and give it a try. It’s really a rather easy process and can come in very handy if you want to explain a problem to a friend or to show off your desktop.